
10 Tips for Taking RV Photos That Will Help It Sell Faster
Successfully showing off your latest RV renovation on social media takes more than randomly snapping RV photos on your cell phone.
We gathered the top 10 tips to help you make your renovated RV shine!
1. Use Natural Lighting for your RV photo
Using natural light is the best way to shoot RV photos, whether listing it your rig for sale or posting on social media.
Photos taken with a flash or at night never look as good as those taken using natural sunlight. RVs typically have a lot of windows, and if all of them appear black in your photos, they will harshly contrast with the beautiful interior you’re trying to highlight.
If you are taking photos with natural light that still seems too dim, turning on additional interior lights is recommended.
When taking photos with natural light, you want to be careful the sunlight isn’t so bright it washes out the photo or causes any glare. You can do this in two ways: either by using indirect sunlight or filtered sunlight.
Indirect sunlight is when lighting comes in and illuminates the room or area, but the sun isn’t shining directly on anything in the photo.
Filtered sunlight is sunlight being filtered through something, typically a sheer curtain. Filtering diffuses harsh, direct sunlight and creates a more aesthetically pleasing photo.
Using natural lighting for your RV photos creates a bright and airy look and makes the interior space feel larger.
If you need help with your photos appearing too dark even when you have plenty of daylight in the room, you can enhance the natural daylight in your photos by editing them with various apps. Many are already built into various phones.
The default Photos app on an iPhone can also do a good job. Below, you can see the “before” and “after” of a photo edited using the Photos app:
To achieve this look, the following settings were adjusted:
- Increased brightness a lot
- Increased contrast a little
- Increased saturation a little
- Increased exposure a little
- Increased warmth a tiny bit

To achieve this look, I adjusted the following settings:
- Increased brightness a lot
- Increased contrast a little
- Increased saturation a little
- Increased exposure a little
- Increased warmth a tiny bit
2. #NoFilter
Don’t use those built-in filters when taking photos of your RV if listing it for sale or on social media. Filters are pretty evident to people these days. Using a filter on your photos may even be interpreted as trying to hide something or make it look better than it really is.
With ample natural lighting and following the rest of these tips, you won’t even need to use a filter!
3. Hide Clutter and Eliminate Distracting Elements
When you set up your shot, you want to ensure everything in it is intentional.
Hide clutter, personal items, and anything else that is out of place or looks distracting. This might include shoes, electronic cables, water bottles, or anything that doesn’t belong. Be sure to check the edges of your photo for out-of-place elements that may be peeking in from the corners.
The idea here is to simplify the scene and be intentional with what you’re portraying with your photo. Besides lousy lighting, clutter is one of the biggest turn-offs in RV sale photo listings.

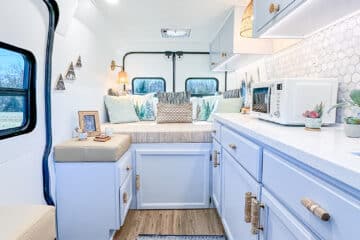
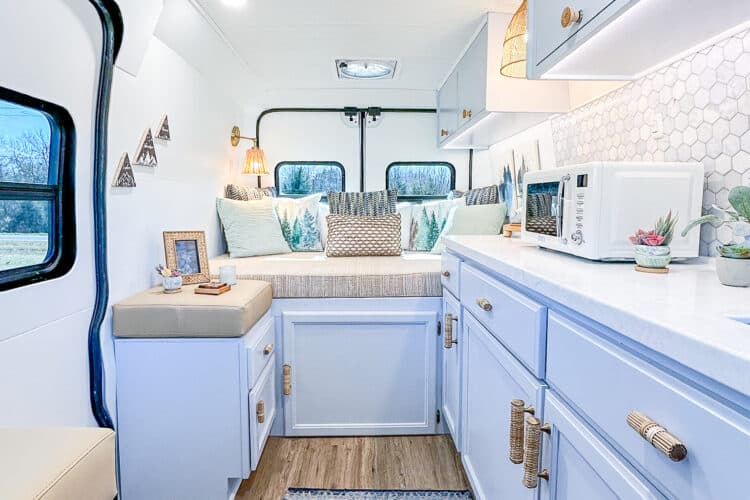
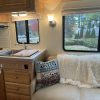
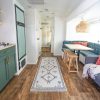
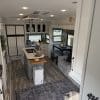
4. Take RV Photos That Show the Whole Room
Rooms in RVs are typically small spaces, and because of that, they can be hard to photograph. Many RV listings will show just a portion of a room or a shot that’s taken way too close, making it difficult to figure out the floor plan of the RV.
In your photos, you want to be far enough away to get a shot of the entire room or as much as possible. Whether standing in the doorway or backing yourself into a corner as far as possible, try to show everything you can in one shot.
Closeups are fine to highlight details, but be sure also to include photos that give context and show where those details fit in the whole room.

Wide-angle lenses can be helpful with this, and many smartphones have built-in wide-angle options. But, even if you don’t have a wide-angle option, try not to make your photo feel too cramped.
There will likely be features you want to highlight up close, like the kitchen sink or stove. And you definitely should! But also include photos from farther back to get the whole kitchen in one shot.
You want people to get a feel for the room or space as a whole. This means also taking photos of doors and hallways and catching glimpses of adjacent spaces. This will help the viewer understand where the space they’re looking at is in relation to other rooms or spaces in the photos.
You’ll also want to include photos of boring things like closets and decorative elements because these are the practical considerations people will have when thinking about what it will be like to live or travel in the RV.
5. Set Your Camera on a Stable Surface
Setting your camera on a stable surface such as a counter, shelf, or tripod will help the quality of your image. In addition to preventing blurry photos, setting your camera on another surface can help you capture more of the room.
You may not be able to get your body flat against the wall, but if there is a shelf or counter, your camera can get the shot on its own.
6. Check Vertical Alignment
Taking photos of your RV to show people what the space looks like is not the time to be “artsy.” You don’t want viewers to tilt their heads to understand what they’re looking at!
Vertical alignment means making sure your photo is straight. If you’re using a smartphone, many phone cameras have grid lines so you can see if your photo is aligned correctly. You can do this by lining up a door frame or corner with your camera or camera-phone gridlines. Or you can edit your photo after the fact and rotate it to look as straight as it is in real life.

7. Don’t Aim Too High or Low
You want to take photos from eye- or face-height perspective. When you’re taking pictures to show off your RV or sell it, you want to convey an image that will help the viewer get a feel for the space as if they were there looking at it.
Be sure your camera is not tilted upward or downward and instead is pointed straight ahead, looking at the room or space. If there is something toward the ceiling or floor that you would like to feature, take a separate photo of it.
8. Take Horizontal and Vertical RV Photos
Taking horizontal and vertical photos will make capturing specific spaces easier, like a bathroom vs. an entire living area. It also will provide a better experience for the viewer.
Horizontal photos can catch a much wider shot and be enlarged to the full-screen width of a laptop or desktop computer, while vertical images will look better on a phone or tablet. (Also, the featured image for your listing at renovatedrvsforsale.com needs to be horizontal to fill the top of the page.)
Take a horizontal shot and a vertical shot of every room or area in the RV that you capture. This will ensure the viewer gets a good feel for the space regardless of their device.
9. No Screenshots of RV Photos
This seems common sense, but it’s widespread to see low-resolution screenshots of photos from a camera roll or computer in RV sale listings and on social media.
Screenshots have a much lower image quality; they can come across as a scam by making people think you don’t have access to the original photos.
Post only original photos directly from your camera or phone camera roll so you can be sure your photos seem authentic and have a much higher image quality.
10. Keep Family Photos Personal
If you have pets or people around when shooting photos of your RV, it is best to keep them out of the shot.
Photos that don’t show people or pets are much better for showing off your RV renovation or listing it for sale. The focus should be on the RV, not the people (or the super adorable and lovable pets) in the RV.
This also gives people the opportunity to imagine themselves in the RV!

Keep It Simple When Shooting RV Photos
The tips listed here will help you produce the best photos, whether showing off your RV renovation or listing it for sale.
Remember:
- Always use natural light to the best of your ability
- Take lots of straight and clear photos of everything
- Use unfiltered original images for the best-quality listing
- Eliminate clutter